The enchanting aroma of freshly baked bread has a way of transforming any ordinary day into a special occasion. Today, I'm excited to share my recipe for Cheesy Garlic Flatbread, a delightful treat that's perfect for a quick family dinner or an impromptu gathering with friends. This recipe not only boasts an irresistible cheesy topping, but it also allows you to whip up a homemade bread that’s far superior to anything you’d find at a fast-food joint. With just 20 minutes of prep time and a comforting garlic-butter infusion, you’ll be savoring golden-brown flatbread in no time. Whether you're slathering it with dips or serving it alongside your favorite soup, this flatbread is sure to become a new family favorite. Are you ready to elevate your cooking game with this scrumptious treat?

Why is this flatbread so irresistible?
Homemade magic: Experience the joy of baking your own bread right at home without fuss.
Garlic-butter bliss: The mouthwatering combination of melted butter and fresh garlic creates a flavor explosion you'll crave.
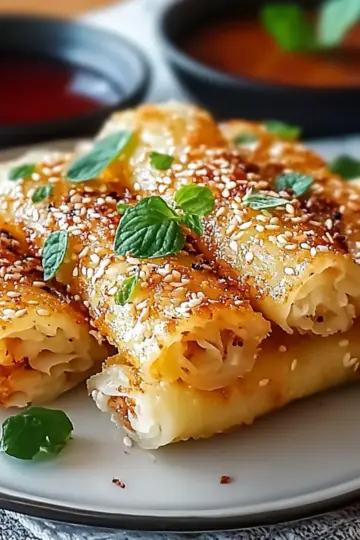
Cheesy goodness: A blend of mozzarella and Parmesan gives this flatbread that ooey-gooey perfection we all desire.
Versatile delight: Perfect as an appetizer, a side, or a standalone snack, it pairs beautifully with soups, salads, or dips.
Quick and easy: In just over an hour, you’ll have freshly baked flatbread that impresses without demanding much of your time. This Cheesy Garlic Flatbread is bound to become a frequent star in your kitchen!
Cheesy Garlic Flatbread Ingredients
For the Dough
- Warm water – 1 cup, as it activates the yeast for a perfect rise.
- Granulated sugar – 1 tablespoon, feeding the yeast for a fluffy texture.
- Active dry yeast – 2 teaspoons, essential for making the flatbread rise wonderfully.
- Olive oil – 2 tablespoons, adds moisture and richness to the dough.
- Salt – 1 teaspoon, enhances all the flavors of your cheesy garlic flatbread.
- All-purpose flour – 3 to 4 cups, the base for our dough; use more if needed to achieve the right consistency.
For the Garlic Butter Topping
- Unsalted butter – 4 tablespoons (melted), brings a luscious flavor to your flatbread.
- Fresh garlic – 4 cloves (minced), because no cheesy garlic flatbread is complete without it!
- Red pepper flakes (optional) – ½ teaspoon, to add a little kick if you like some heat.
For the Cheesy Topping
- Shredded mozzarella cheese – 1 cup, provides that delightful stretch and gooey goodness.
- Grated Parmesan cheese – ½ cup, adds a savory depth to the cheesy topping.
For Garnish
- Fresh parsley – chopped, for a pop of color and freshness on your delicious flatbread.
Embrace the simplicity and warmth of homemade comfort food with this Cheesy Garlic Flatbread recipe—the perfect crowning glory for any mealtime!
Step‑by‑Step Instructions for Cheesy Garlic Flatbread
Step 1: Activate the Yeast
In a large bowl, combine 1 cup of warm water, 1 tablespoon of granulated sugar, and 2 teaspoons of active dry yeast. Stir gently to dissolve, then let the mixture sit undisturbed for about 5–10 minutes until it becomes frothy, signaling that the yeast is ready for action.
Step 2: Make the Dough
Once your yeast mixture is foamy, add 2 tablespoons of olive oil and 1 teaspoon of salt. Gradually whisk in 3 to 4 cups of all-purpose flour, one cup at a time. Stir until a shaggy dough forms, then use your hands or the back of a spoon to incorporate the flour completely until no dry bits remain.
Step 3: Knead the Dough
Turn the dough out onto a lightly floured surface. Knead the dough for 5–7 minutes until it turns smooth and elastic, achieving a nice sheen. You might need to sprinkle additional flour if the dough feels too sticky. This hand-kneading will build the gluten structure essential for your Cheesy Garlic Flatbread.
Step 4: Let the Dough Rise
Place the kneaded dough in a lightly greased bowl, ensuring it’s coated to prevent sticking. Cover it with a clean kitchen towel and let it rise in a warm place for 45 minutes to 1 hour, or until it has doubled in size. You’ll know it’s ready when you can gently poke it and the indentation remains.
Step 5: Prepare the Garlic-Cheese Topping
While the dough rises, prepare the garlic-cheese topping. In a small bowl, combine 4 tablespoons of melted unsalted butter, 4 minced garlic cloves, and ½ teaspoon of red pepper flakes if desired. In another bowl, mix together 1 cup of shredded mozzarella cheese and ½ cup of grated Parmesan cheese for that delicious cheesy layer.
Step 6: Shape the Flatbreads
Once the dough has risen, gently punch it down to release the trapped air. Divide it into two equal portions. Using a rolling pin or your hands, shape each portion into an oval or rectangular shape about ¼ to ½ inch thick. This is where the magic of your Cheesy Garlic Flatbread begins to take form!
Step 7: Preheat the Oven
Preheat your oven to 425°F (220°C). If you're using a pizza stone, place it in the oven now so that it preheats alongside, allowing enough time (at least 30 minutes) for it to reach the ideal temperature for baking.
Step 8: Assemble the Flatbread
Carefully transfer one shaped flatbread onto parchment paper or directly onto the preheated pizza stone or baking sheet. Brush it generously with the garlic butter mixture, ensuring each bite will be packed with flavor. Sprinkle the mixed cheeses evenly over the top, creating a cheesy blanket on your flatbread.
Step 9: Bake to Perfection
Bake the flatbread in the oven for 12–15 minutes, until the crust is golden brown and the cheese is bubbly and beginning to turn slightly golden. Keep an eye on it during the last few minutes to prevent over-baking. Remove it carefully, and repeat the process with the second flatbread for the ultimate Cheesy Garlic Flatbread experience.

Make Ahead Options
Making Cheesy Garlic Flatbread ahead of time is a fantastic way to save yourself some hassle on busy weeknights! You can prepare the dough (up to step 4) and refrigerate it for up to 24 hours. Just be sure to cover it properly to prevent it from drying out. When you’re ready to bake, allow the dough to come to room temperature for about 30-45 minutes before shaping and baking. The garlic butter topping can be made in advance and stored in the fridge as well—just reheat it slightly before brushing on the flatbread. Follow these steps, and you’ll have deliciously warm Cheesy Garlic Flatbread with minimal effort, perfect for any mealtime!
How to Store and Freeze Cheesy Garlic Flatbread
Room Temperature: Store leftover flatbread in an airtight container for up to 3 days. Keep in a cool, dry place to maintain its texture.
Fridge: If you want your cheesy garlic flatbread to last a bit longer, wrap it tightly in plastic wrap and refrigerate for up to 5 days. Reheat before serving for the best flavor and texture.
Freezer: For long-term storage, freeze flatbread by wrapping it tightly in aluminum foil or plastic wrap, then placing it in a freezer-safe bag. Enjoy within 2 months for optimal taste.
Reheating: To reheat, pop the flatbread in a preheated oven at 350°F (175°C) for about 10 minutes or until heated through and crispy once again. Enjoy your cheesy garlic flatbread like it was freshly baked!
Expert Tips for Cheesy Garlic Flatbread
- Yeast Activation: Make sure your warm water isn’t too hot; it should feel like a warm bath. If the mixture doesn’t foam, your yeast may be inactive.
- Knead Effectively: Knead until smooth and elastic for the best texture. If too sticky, sprinkle in a little more flour but avoid excess to keep the flatbread soft.
- Proper Rising: Ensure a warm, draft-free environment for the dough to rise. An oven light or a warm corner works wonders for doubling in size.
- Don’t Overload Toppings: While cheesy is good, avoid piling on too much cheese and butter; it can make the flatbread gummy instead of light and crispy.
- Perfect Baking: Watch closely toward the end; every oven behaves differently. You want that golden brown, bubbly cheese but not burnt edges!
Embrace these tips for an irresistible Cheesy Garlic Flatbread every time you bake!
Cheesy Garlic Flatbread Variations
Discover delicious ways to customize your flatbread that will suit every palate!
-
Gluten-Free: Substitute all-purpose flour with a 1:1 gluten-free flour blend for a similar texture.
-
Cheese Lovers: Mix in some cheddar or gouda for a sharper flavor that will elevate your cheesy topping.
-
Herb Infusion: Incorporate fresh herbs such as rosemary or thyme into the dough or topping for added fragrance.
-
Savory Spin: Add sautéed mushrooms or caramelized onions on top before baking to enhance the savory experience.
-
Spicy Kick: For a bolder flatbread, use spicy garlic oil instead of melted butter for that extra heat.
-
Vegan Twist: Replace butter with olive oil and cheese with vegan cheese for an entirely plant-based version without compromising flavor.
-
Provolone Touch: Swap half of the mozzarella for provolone cheese for a delightful twist that melts beautifully.
These variations open up a world of possibilities, allowing you to personalize each bite and keep the recipes fresh for your family and friends. Enjoy experimenting!
What to Serve with Cheesy Garlic Flatbread
Nothing elevates a meal quite like a side that perfectly complements the rich flavors of warm, cheesy, and garlicky goodness.
- Creamy Tomato Soup: Its smooth texture and tangy flavor make it a classic pairing, perfect for dipping your flatbread. Nothing warms the soul quite like this combination.
- Mixed Green Salad: A light salad with a zesty vinaigrette brings a refreshing contrast to the rich flatbread, allowing each bite to shine. The crunch of fresh greens is an invigorating balance.
- Herbed Dipping Oil: A simple blend of olive oil, fresh herbs, and garlic creates a delightful dip that enriches each slice of flatbread with flavor. It’s an instant crowd-pleaser!
- Stuffed Mushrooms: Savory, cheesy stuffed mushrooms offer a bite-sized treat that mirrors the comforting qualities of the flatbread, making for a fabulous starter or addition.
- Grilled Vegetable Platter: Roasted or grilled seasonal veggies provide a colorful and nutritious complement that brings both flavor and texture to the table. They add a wholesome twist!
- Sangria or Sparkling Lemonade: A refreshing drink with fruity notes or a citrusy fizz enhances the overall dining experience, cleansing the palate between bites of cheesy delight.
- Chocolate Fondue: For dessert, imagine the joy of dipping fresh fruits or marshmallows into luscious chocolate, creating a sweet ending that offsets the savory flatbread. Indulge your sweet tooth!

Cheesy Garlic Flatbread Recipe FAQs
How do I choose the right garlic for my flatbread?
When selecting garlic, opt for firm bulbs with dry skins and no dark spots. Fresh garlic will have a strong aroma and should feel heavy for its size. Avoid garlic that is sprouting or has been stored for too long, as it may not provide the full flavor burst you desire in your Cheesy Garlic Flatbread.
What’s the best way to store leftover flatbread?
To store leftover Cheesy Garlic Flatbread, place it in an airtight container and store it at room temperature for up to 3 days. For longer storage, wrap it tightly in plastic wrap or aluminum foil and refrigerate for up to 5 days. Always reheat it in the oven for that just-baked freshness!
Can I freeze Cheesy Garlic Flatbread?
Absolutely! To freeze your flatbread, wrap it tightly in aluminum foil or plastic wrap, then place it in a freezer-safe bag. It’s best enjoyed within 2 months for the best taste. When you're ready to enjoy, simply reheat it in the oven at 350°F (175°C) for about 10 minutes until warmed through.
How do I troubleshoot issues with my flatbread?
If your flatbread doesn’t rise well, check if your yeast is fresh and the water is at the right temperature—not too hot or cold. If your dough is too sticky, you may need to knead in a little extra flour until it's manageable. Also, make sure to let it rise in a warm, draft-free environment for optimal results.
Are there any dietary considerations for this recipe?
This recipe is vegetarian-friendly, but if you’re concerned about dairy, feel free to substitute the cheeses with non-dairy alternatives. Always check labels for gluten if you have an intolerance, and there's no harmful garlic for pets, although it’s best to keep it away from your furry friends entirely. Enjoy your delicious Cheesy Garlic Flatbread safely!

Irresistibly Cheesy Garlic Flatbread Made Easy at Home
Ingredients
Equipment
Method
- In a large bowl, combine 1 cup of warm water, 1 tablespoon of granulated sugar, and 2 teaspoons of active dry yeast. Stir gently to dissolve, then let the mixture sit undisturbed for about 5–10 minutes until it becomes frothy.
- Add 2 tablespoons of olive oil and 1 teaspoon of salt. Gradually whisk in 3 to 4 cups of all-purpose flour, one cup at a time, until no dry bits remain.
- Turn the dough onto a lightly floured surface and knead for 5–7 minutes until smooth and elastic.
- Place the kneaded dough in a greased bowl, cover, and let it rise in a warm place for 45 minutes to 1 hour until doubled.
- Prepare the garlic-cheese topping by combining melted butter, minced garlic, and red pepper flakes, and mixing the cheeses in another bowl.
- Once the dough has risen, punch it down, divide into two portions, and shape into ovals about ¼ to ½ inch thick.
- Preheat your oven to 425°F (220°C). If using a pizza stone, place it in the oven now.
- Transfer one flatbread onto parchment paper, brush with garlic butter mixture, and sprinkle the mixed cheeses evenly.
- Bake for 12–15 minutes until golden brown and bubbly. Remove and repeat with the second flatbread.


Leave a Reply