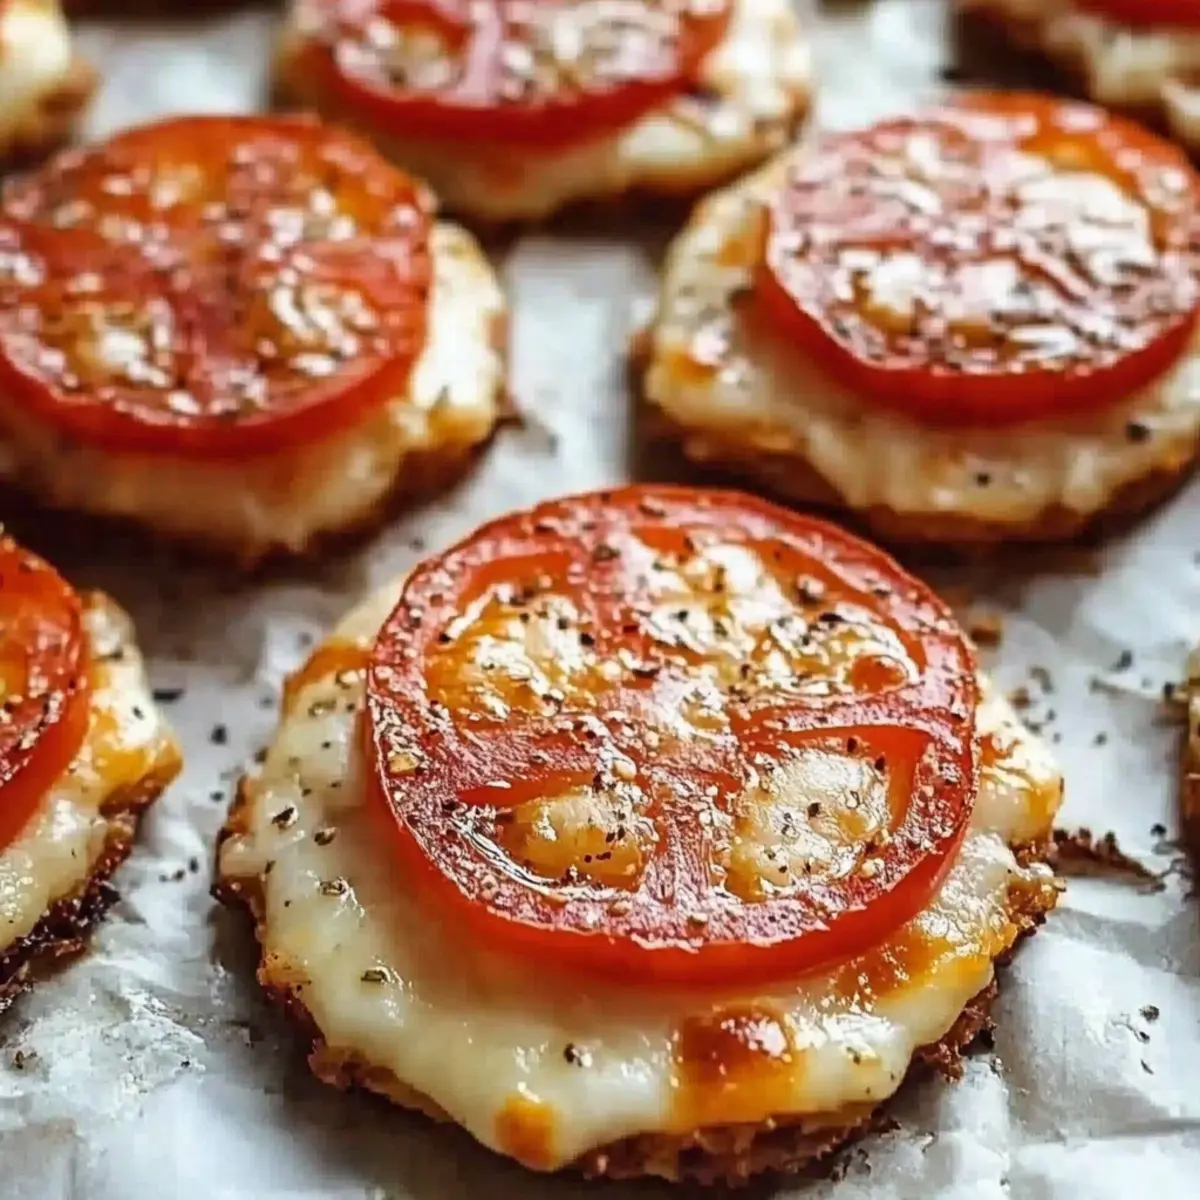
As I stood in my kitchen, the aroma of melting cheese wafted around me, stirring memories of cozy family gatherings and lazy Sunday afternoons. Today, I'm excited to share my recipe for Baked Mac & Cheese with Crispy Panko Topping, the ultimate comfort food that transforms a simple pantry staple into something truly special. Not only is this dish delightfully creamy and indulgent, but it also comes together in just 50 minutes, making it the perfect solution for a weeknight dinner or a potluck. The golden, crunchy panko topping adds a satisfying texture that will impress everyone at the table. Ready to elevate your homemade meal game? Keep reading to discover how to whip up this cheesy masterpiece!
Why is this mac and cheese unforgettable?
Creamy, Dreamy Goodness: The blend of sharp cheddar, Gruyère, and mozzarella creates a rich, velvety cheese sauce that's simply irresistible.
Crispy Texture: Topped with a crunchy panko and Parmesan mixture, this dish combines soft and crispy textures, elevating your comfort food experience.
Quick & Easy: With just 15 minutes of prep time, you'll have a satisfying meal on the table in under an hour—perfect for busy weeknights!
Crowd-Pleasing Delight: Whether for family gatherings or potlucks, this baked mac and cheese is always a hit, ensuring bright smiles and happy bellies.
Versatile Recipe: Feel free to personalize it by adding your favorite vegetables or protein—it's a flexible dish that caters to every preference!
Baked Mac Cheese Ingredients
For the Cheese Sauce
• 5 tablespoon butter – This provides a rich base for your cheese sauce.
• ¼ cup all-purpose flour – Helps thicken the sauce for that creamy texture.
• 3 cups milk – Use whole milk for a richer flavor, but any milk works!
• 1 cup sharp cheddar cheese, shredded – Adds a tangy taste that enhances the dish.
• 2 ½ cups Gruyère cheese, shredded – Brings nuttiness and depth to the cheese mixture.
• 1 ½ cups mozzarella cheese, shredded – Ensures a melty, gooey consistency.
For Seasoning
• 3 tablespoon Dijon mustard – Adds a touch of zing that balances the richness.
• ½ teaspoon garlic powder – Infuses a lovely aroma and flavor.
• ½ teaspoon onion powder – Complements the cheese blend beautifully.
• 1 teaspoon salt – Enhances all flavors and ties the dish together.
• ½ teaspoon black pepper – Adds a hint of spice to the overall flavor.
For the Pasta and Topping
• 3 cups elbow macaroni, cooked – The backbone of this baked mac cheese masterpiece!
• ¼ cup panko breadcrumbs – Gives that beloved crispy topping we all crave.
• ½ cup Parmesan cheese, grated – Adds extra flavor and crispiness when baked.
Elevate your homemade comfort food experience with this Baked Mac Cheese with Crispy Panko Topping!
Step‑by‑Step Instructions for Baked Mac Cheese with Crispy Panko Topping
Step 1: Preheat the Oven
Begin by preheating your oven to 350°F (175°C). This ensures that your baked mac cheese will cook evenly and develop that lovely golden-brown crust as it bakes. While the oven heats up, gather all your ingredients to save time and make the process smoother.
Step 2: Create the Butter Base
In a large saucepan over medium heat, melt 5 tablespoons of butter until bubbling, about 1 minute. Once melted, add ¼ cup of all-purpose flour, stirring constantly for another minute until it forms a roux. This golden mixture will be the foundation for your rich cheese sauce, warming the kitchen with its inviting aroma.
Step 3: Whisk in the Milk
Gradually pour in 3 cups of milk, whisking continuously to create a smooth consistency. Cook the mixture over medium heat for about 5 minutes or until it thickens and coats the back of a spoon. You’re aiming for a luscious, velvety texture that will perfectly envelop your macaroni later on.
Step 4: Melt the Cheese
Once thickened, remove the saucepan from heat and stir in 1 cup of sharp cheddar, 2 ½ cups of Gruyère, and 1 ½ cups of mozzarella cheese. Add 3 tablespoons of Dijon mustard, ½ teaspoon each of garlic and onion powder, 1 teaspoon of salt, and ½ teaspoon of black pepper. Stir until all the cheeses are fully melted and combined into a delightful, creamy sauce.
Step 5: Combine the Macaroni with the Cheese Sauce
In a large mixing bowl, combine the cooked 3 cups of elbow macaroni with your cheesy sauce. Use a spatula to gently fold the pasta into the sauce, ensuring every piece is coated. This is where the magic happens—the creamy indulgence of your Baked Mac Cheese with Crispy Panko Topping starts taking shape!
Step 6: Transfer to Baking Dish
Pour the mac and cheese mixture into a greased baking dish, spreading it evenly with a spatula. It's essential to ensure the pasta is evenly distributed, which allows for uniform cooking. This step sets you up for a beautiful baked dish with a crispy topping everyone will love.
Step 7: Prepare the Crispy Topping
In a small bowl, combine ¼ cup of panko breadcrumbs with ½ cup of grated Parmesan cheese. Mix until well combined, then sprinkle this delightful mixture evenly over the top of your macaroni and cheese. This topping will transform into a golden crust in the oven, adding that satisfying crunch.
Step 8: Bake to Perfection
Place the baking dish in the preheated oven and bake for 30-35 minutes, or until the top is golden brown and bubbling. Keep an eye on the dish as it bakes, as this is the point when your kitchen will fill with an irresistible cheesy aroma, making it hard to wait!
Step 9: Optional Broiling for Extra Crisp
For an even crispier topping, you can broil the dish for an additional 2-3 minutes after baking. Just watch closely to prevent burning. The extra heat will elevate your Baked Mac Cheese with Crispy Panko Topping to a whole new level, making the crust perfectly crunchy and irresistible!

Make Ahead Options
These Baked Mac & Cheese with Crispy Panko Topping are perfect for meal prep enthusiasts! You can prepare the entire dish up to 24 hours in advance, just refrigerate it in the baking dish before baking. To do this, follow all the steps through combining the macaroni with the cheese sauce and transferring it to the baking dish, then cover tightly with plastic wrap. Just before baking, remove the plastic wrap and sprinkle on the panko topping. When you're ready to serve, pop it in the preheated oven for 30-35 minutes or until bubbly and golden. This way, you'll savor that freshly baked flavor even on the busiest of weeknights!
Expert Tips for Baked Mac Cheese
Cheese Selection: Choose high-quality cheeses for the best flavor. Aged varieties will give your baked mac cheese with crispy panko topping an extra depth that's hard to resist.
Mix It Up: Feel free to customize with added ingredients like cooked bacon, sautéed vegetables, or even a sprinkle of cayenne for heat—beware of overpowering the cheese!
Layer for Texture: When mixing the macaroni with the cheese sauce, make sure it’s evenly coated. This prevents dry patches and ensures every bite is creamy.
Crisp Factor: For an even crunchier topping, mix in some finely chopped nuts or crushed crackers with the panko breadcrumbs. Just a small amount makes a delightful difference!
Rest Before Serving: Allow the baked mac cheese to rest for about 10 minutes before serving. This helps it set, making it easier to slice and serve without spilling everywhere!
Baked Mac Cheese Variations & Substitutions
Customize your Baked Mac Cheese with Crispy Panko Topping to delight everyone's taste buds, enhancing flavors and textures!
- Gluten-Free: Substitute all-purpose flour with a gluten-free flour blend and use gluten-free pasta for a celiac-friendly version.
- Veggie-Loaded: Fold in sautéed spinach, roasted bell peppers, or steamed broccoli to add nutrition and vibrant color to the dish.
- Spicy Kick: Mix in diced jalapeños or a sprinkle of red pepper flakes for those who love a little heat that ignites the senses.
- Creamy Vegan Option: Use non-dairy milk, cashew cheese, and nutritional yeast for a plant-based take that everyone can enjoy.
- Meaty Twist: Add crispy bacon bits or diced ham for a savory touch that complements the cheese perfectly, making every bite a little more indulgent.
- Herb Infusion: Stir in fresh herbs like thyme, parsley, or basil before baking to brighten the dish and elevate the flavor profile.
- Extra Crunch: Swap panko breadcrumbs for crushed potato chips or tortilla chips, introducing a delightful new crunch for a fun texture twist.
- Cheese Variety: Experiment with different cheese blends, like pepper jack for some extra spice or goat cheese for a tangy surprise that adds creaminess.
Let your imagination run wild and create a Baked Mac Cheese that's uniquely yours!
How to Store and Freeze Baked Mac Cheese
Fridge: Ideally, store your baked mac cheese in an airtight container for up to 3 days. Allow it to cool completely before sealing to maintain its delicious creaminess.
Freezer: You can freeze the mac and cheese for up to 3 months. Portion it into freezer-safe containers, letting it cool fully before wrapping each part tightly.
Reheating: To reheat, thaw overnight in the fridge, then warm in the oven at 350°F (175°C) until heated through and slightly bubbling. You may want to add a splash of milk to restore creaminess!
Serving Tip: For the best taste, avoid repeated freezing, as this might affect the texture of your cheesy masterpiece, making it less enjoyable than fresh Baked Mac Cheese with Crispy Panko Topping!
What to Serve with Baked Mac & Cheese with Crispy Panko Topping
Enhance your comforting meal with delightful sides that perfectly balance creamy mac and cheese.
-
Garlic Bread: The crispy, buttery goodness of garlic bread offers a delightful crunch that complements the velvety cheese sauce perfectly. Dip it into any cheesy remnants left on your plate for an extra treat!
-
Fresh Garden Salad: A light and refreshing salad filled with seasonal greens balances the richness of the mac and cheese. Add a zesty vinaigrette for a burst of flavor that will brighten each bite.
-
Roasted Broccoli: These tender, slightly charred florets add a wonderful earthy flavor, providing a nutritious contrast to the creamy pasta. Plus, the vibrant green color enhances the plate's visual appeal.
-
Grilled Chicken: Juicy, savory chicken makes a protein-packed addition that rounds out the meal, ensuring everyone leaves the table satisfied. Season it with herbs and spices for an extra flavor boost!
-
Coleslaw: A tangy, crunchy slaw not only adds a refreshing element but also brings an exciting texture contrast to the rich cheese. The coolness plays beautifully against the warm mac and cheese.
-
Fizzy Lemonade: A glass of chilled lemonade adds a perfect zesty burst that cuts through the creamy richness of the baked mac cheese with crispy panko topping, making each mouthful feel light and revitalizing.
-
Chocolate Chip Cookies: For dessert, these classic treats offer a warm, sweet ending. Their gooey chocolate centers are delightful next to the savory mac and cheese—perfect for any comfort food lover!

Baked Mac Cheese with Crispy Panko Topping Recipe FAQs
What is the best type of cheese to use for mac and cheese?
Absolutely! For the creamiest and most flavorful results, I recommend using a combination of sharp cheddar, Gruyère, and mozzarella. The sharp cheddar provides a tangy kick, Gruyère adds nutty depth, and mozzarella gives that gooey melt you crave. Feel free to experiment with other varieties, like fontina or smoked cheeses, but avoid overly crumbly cheeses that won't melt well!
How should I store leftover baked mac cheese?
Very! Store your Baked Mac Cheese with Crispy Panko Topping in an airtight container in the refrigerator. It will stay good for up to 3 days. To keep it fresh, allow it to cool completely before sealing. If you want to reheat, simply pop it in the oven at 350°F (175°C) until heated through, adding a splash of milk if necessary for creaminess.
Can I freeze my baked mac and cheese?
Of course! You can freeze your delicious mac and cheese for up to 3 months. I recommend portioning it into freezer-safe containers, allowing it to cool fully before wrapping each portion tightly. When you're ready to enjoy it again, thaw it overnight in the fridge, then heat it in the oven at 350°F (175°C) until hot and bubbly. This way, you're just a quick bake away from comfort food bliss!
What should I do if my cheese sauce is too thick?
Don't worry, we've all been there! If your cheese sauce turns out too thick, simply whisk in a little more warm milk until you reach the desired consistency. This will help restore that creamy texture. Always remember, the sauce should coat the back of a spoon but still flow smoothly when mixed with the pasta.
Can my pets enjoy baked mac cheese?
In general, it’s best to avoid sharing this dish with pets. The ingredients like cheese and butter aren't harmful in very small amounts for most pets, but the high fat and lactose content can be difficult for them to digest. Always consult with a vet before treating your furry friends to table scraps—better safe than sorry!
What can I add to enhance the flavor of my baked mac cheese?
The more the merrier! I love adding cooked vegetables like spinach or broccoli for a nutritional boost and a pop of color. You could also sprinkle in some crumbled bacon for a savory crunch or mix in a touch of cayenne pepper for a spicy kick. Just remember to keep the cheese flavor at the forefront!

Indulgent Baked Mac Cheese with Crispy Panko Topping
Ingredients
Equipment
Method
- Preheat your oven to 350°F (175°C).
- In a large saucepan over medium heat, melt 5 tablespoons of butter until bubbling. Add ¼ cup of all-purpose flour, stirring constantly until it forms a roux.
- Gradually pour in 3 cups of milk, whisking continuously until it thickens and coats the back of a spoon.
- Remove from heat and stir in 1 cup of sharp cheddar, 2 ½ cups of Gruyère, and 1 ½ cups of mozzarella cheese, along with the Dijon mustard and seasonings.
- In a large mixing bowl, combine the cooked elbow macaroni with the cheese sauce, folding until every piece is coated.
- Pour the macaroni and cheese mixture into a greased baking dish, spreading evenly.
- In a small bowl, combine ¼ cup of panko breadcrumbs with ½ cup of grated Parmesan cheese. Mix and sprinkle evenly over the macaroni and cheese.
- Bake for 30-35 minutes, until the top is golden brown and bubbling.
- For extra crispiness, broil for an additional 2-3 minutes after baking.


Leave a Reply